
A pitching machine can completely transform how you or your team trains for baseball or softball. While many players rely on commercial options, these machines can cost anywhere from hundreds to thousands of dollars — a serious investment, especially for families or local teams with a tight budget.
That’s where the DIY route comes in.
Building your own pitching machine isn’t just a cost-saving idea — it gives you full control over the features, speed, and style of your practice partner. Whether you’re a coach training a Little League team, a parent with a backyard cage, or a player looking to refine your skills, this guide will walk you through every step. You’ll learn what parts you need, how to assemble them, and how to safely test and maintain your machine.
Let’s dive in.
Understanding the Basics: What Makes a Pitching Machine Work?
Before we even touch a tool or a motor, you need to understand what makes a pitching machine work — because knowing how it functions will help you build smarter and safer.
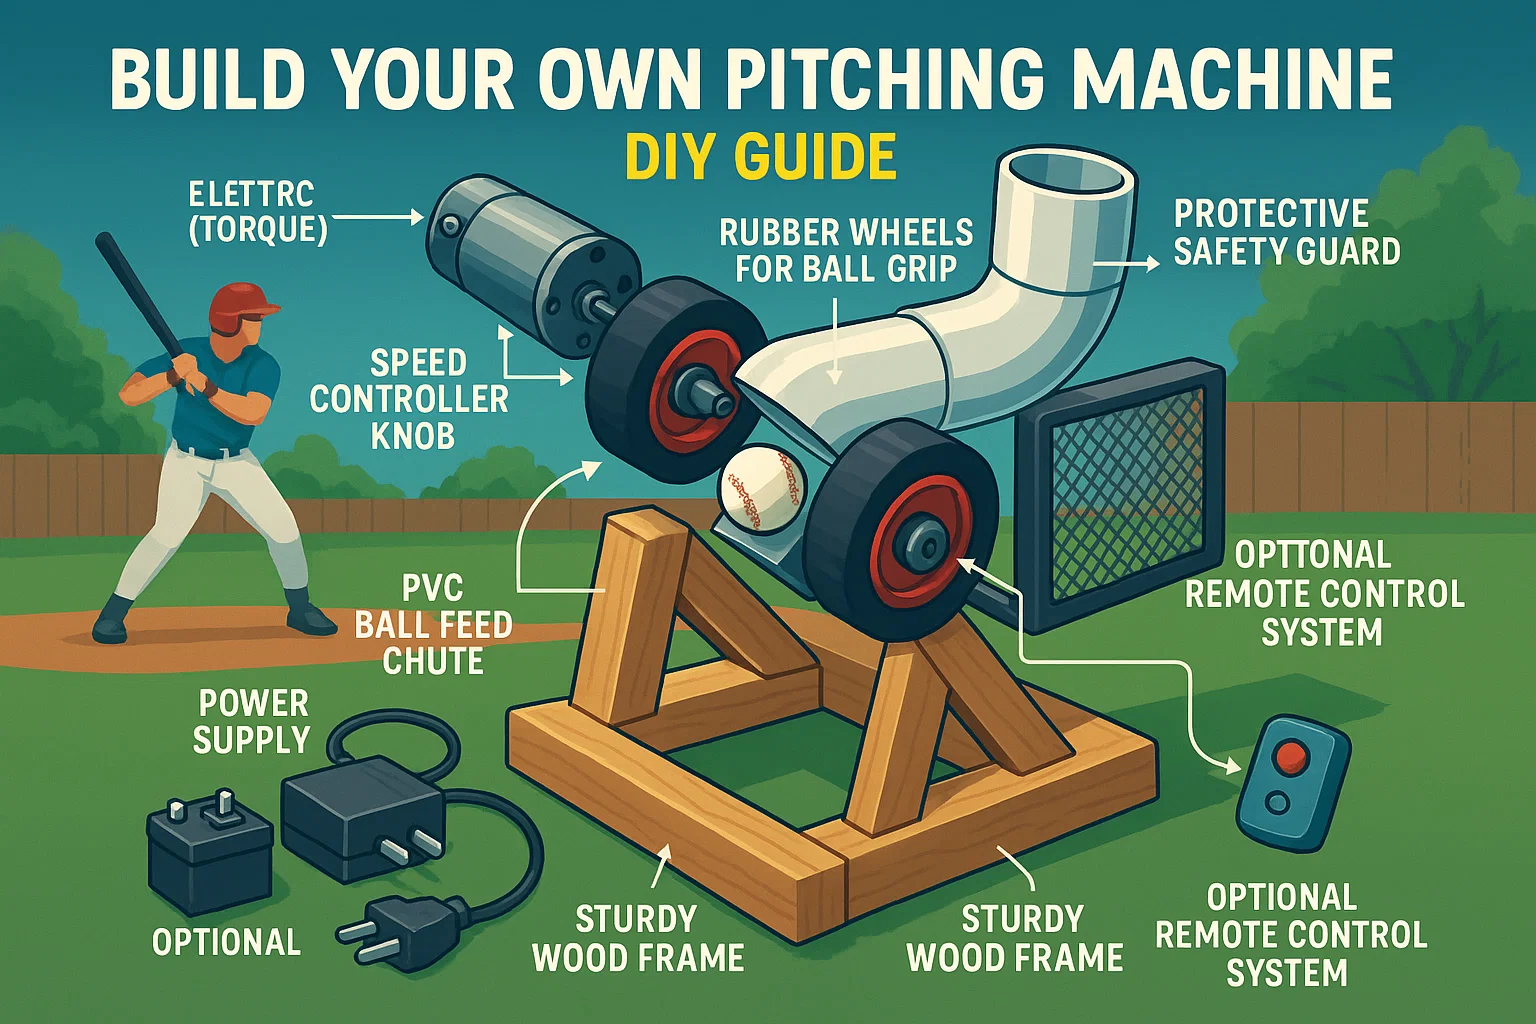
At its core, a pitching machine mimics the motion of a real pitcher. It throws balls at set speeds and angles, allowing batters to practice swing timing, hand-eye coordination, and reaction speed. The most common and effective models are wheel-based, meaning they use rubber wheels spinning at high speed to “grab” the ball and launch it forward.
Other types include:
- Arm-style machines, which use a mechanical arm to sling the ball like a pitcher.
- Compressed air machines, which use blasts of air to shoot balls forward (less common for DIY).
Each type has pros and cons, but for this guide, we’ll focus on building a wheel-based machine — because it’s reliable, adjustable, and beginner-friendly when it comes to homemade builds.
What You’ll Need: Materials and Tools
Before you start, take time to gather all your tools and components. Trust us, having everything in one place before you begin makes the entire project smoother and safer.
🧰 Materials
- Electric Motors (x2): High-torque motors are key. You’ll want motors strong enough to spin the wheels fast — ideally ¼ HP or more, with around 1750–3450 RPM capacity.
- Rubber Wheels (x2): These will do the actual “throwing.” Look for 9–12-inch solid rubber wheels, the kind used in carts or yard tools.
- Speed Controller: A motor speed controller lets you change the pitching speed easily — from gentle tosses to fastballs.
- Power Supply: Choose either an AC power system (standard outlet) or a 12V/24V battery setup for portability.
- Ball Feed System: PVC pipe or plastic tubing can work well as a ball chute to guide balls between the wheels.
- Frame Materials: You’ll need wood (like plywood and 2x4s) or metal for the machine’s structure.
- Protective Guards: Mesh or plexiglass covers to shield users from moving parts.
- Wiring and Switches: Basic electric components to control the on/off functions.
🛠 Tools
- Drill and drill bits
- Screwdrivers (flat and Phillips)
- Saw (hand saw or power saw depending on your frame material)
- Measuring tape and ruler
- Wrenches and pliers
- Safety gloves and goggles
- Sandpaper (for smoothing edges)
Once you’ve gathered everything, set up a safe and spacious work area. You’ll want room to spread out parts and ensure accurate assembly.

Step-by-Step Construction Guide
1. Designing the Frame
This is the skeleton of your machine — so it needs to be strong, stable, and precise.
Start by sketching out a design on paper. Think about:
- Height: Will it sit on the ground or on a stand? Most pitching machines are about 3–4 feet tall for standard use.
- Wheel Placement: Your two wheels should face each other horizontally or vertically depending on the type of pitch you want to generate.
- Motor Mounting: You’ll need enough space and stability to secure the motors tightly without vibration.
- Ball Entry Point: Design a guide chute that aligns perfectly between the wheels so that the ball feeds in the same spot every time.
A good base frame can be made from strong plywood and 2x4s. If you’re experienced with welding, a steel frame works even better for durability.
💡 Pro Tip: Always overbuild the frame rather than underbuild — the last thing you want is a wobbling, unsafe machine during use.
2. Assembling the Frame
Now it’s time to turn your sketch into something real.
- Cut your frame pieces to the dimensions in your design.
- Assemble the base first, ensuring it’s level on the floor.
- Use screws, bolts, or welding (for metal) to assemble upright supports.
- Attach a sturdy crossbar or mount where the motors and wheels will go.
Once assembled, double-check the stability. Push it lightly to see if it rocks. If it does, reinforce the joints with extra brackets or diagonal wood/metal braces.
3. Mounting the Motors and Wheels
This is the heart of your machine. Precision matters.
- Secure the motors to the frame using mounting brackets or custom plates.
- Make sure both motors are directly facing each other, so they pull the ball in smoothly.
- Attach each rubber wheel securely to the motor shafts. They should spin freely with no wobble.
Now test the wheels by turning the motors on at low speed. They should spin evenly, without contact. If you hear scraping or see shaking, stop and adjust.
💡 If you want pitch variation, install each motor on an adjustable plate. That way, you can shift one higher/lower for curveballs or sliders later.
4. Installing the Speed Controller
A pitching machine without speed control is like a car with no gas pedal — so this step is vital.
- Wire the speed controller between your power source and both motors.
- If your motors are DC, use a compatible DC controller. For AC motors, a variable frequency drive (VFD) works well.
- Add a knob or digital controller that allows easy adjustment — from slow tosses (around 30 MPH) to fast pitches (up to 70+ MPH depending on motor strength).
💡 Test gradually — don’t jump to max speed right away. Watch how the wheels respond and make sure the structure holds firm.
5. Setting Up the Power Supply
Now it’s time to bring your machine to life.
- If you’re using batteries, place them in a secure, ventilated battery box on or near the frame.
- For AC power, ensure the machine is near a safe, dry outlet.
- Use fused wires or inline breakers to prevent overload or shorts.
💡 Use heavy-duty power cords — motors draw a lot of current, and cheap cords can overheat.
6. Creating the Ball Feed Mechanism
Feeding the ball properly is what turns your machine from manual to magical.
- Use a piece of PVC pipe about 2–3 inches in diameter.
- Position it at an angle so that gravity naturally feeds the ball between the two spinning wheels.
- Attach the top end to a bucket or hopper where you can stack multiple balls.
- Secure the chute to the frame using clamps or brackets.
💡 Want to go fancy? Install a small motorized feeder to drop balls in at intervals.
7. Adding Safety Features
Never skip this step. Those wheels spin fast — and can seriously injure fingers or hands.
- Attach plexiglass or mesh covers around the spinning wheels.
- Cover the sides and rear of the frame with a strong screen.
- Add warning labels and paint visible red zones near dangerous parts.
- Include an emergency kill switch near the power source — just in case.
💡 Teach every user the safety rules — especially kids. No fingers near the chute while the machine is powered.
8. Testing the Machine
Now for the exciting part — your first test pitch!
- Start by feeding a soft foam ball while motors are on the lowest speed.
- Observe how the ball exits the machine — straight? Sideways? Too slow?
- If needed, adjust motor speed, wheel spacing, or ball feed angle.
- Try different ball types: foam, rubber, dimpled, or real leather.
💡 Document your pitch speeds at different settings using a radar gun or visual tracking — this helps in future adjustments.

Customization and Enhancements
Once your basic model is working, you can take it to the next level.
⚙️ Adjustable Pitch Angles
- Mount the wheel assembly on a hinge or tilting base.
- Add a locking arm or crank to adjust the vertical pitch angle (for fly balls, grounders, etc.).
🌀 Random Pitch Speeds
- Add a simple microcontroller (like Arduino) with a relay to randomly adjust wheel speed within a range — simulating real-game unpredictability.
🧲 Remote Operation
- Install a wireless switch or Bluetooth relay module so you can activate the machine from 10–20 feet away. Great for solo practice!
🔁 Ball Return System
- Build a simple net behind the batter that funnels balls into a bucket.
- Add a conveyor belt or gravity-fed chute to bring balls back to the feed hopper.
Maintenance Tips
To keep your homemade machine safe and effective, routine care is essential.
- Inspect Weekly: Check all bolts, motor mounts, and wheel alignment.
- Lubricate Bearings: If your motors or wheel shafts have moving bearings, apply light oil every month.
- Clean the Wheels: Dirt buildup can affect grip. Wipe rubber surfaces clean after each session.
- Protect from Rain: Store your machine indoors or cover it if used outside. Water can damage electronics and metal parts.
- Replace Worn Parts: If you notice slowed performance or strange noises, check for motor wear, wheel cracks, or frayed wires.
Final Thoughts: Is It Worth It?
Absolutely.
Building your own pitching machine isn’t just a fun weekend project — it’s an investment in better training, smart savings, and hands-on learning. You’ll come away with:
✅ A reliable machine tailored to your needs
✅ Extra knowledge of pitching mechanics and ball flight
✅ The pride of building something from scratch
Whether you’re training your child to swing with confidence, helping a team sharpen their game, or just looking for the ultimate backyard setup — your DIY pitching machine will deliver every time.
Ready to build it?
Then grab your tools… and play ball. ⚾


